Monday, September 26, 2011

Chili-Corn Casserole


Remember when I told you to save those few cups of Slow-Cooker Texas Chili for later?  Well, have no fear.  It is now later.  And we're about to make some magic by mixing this chili with corn, scallions, polenta, and cheese.

Get on this.  It is heavenly.

I shouldn't have to "note" this, but I will, just to make sure you know...You can use any chili you like in this dish.  You don't have to make the Slow-Cooker Texas Chili recipe.  You should make it because it's  delicious, but I realize it may not be for everyone.  So have at it with whatever kind of chili you want.

Now can we just jump right in?  Because I'm starving (as usual) and I need my sustenance.


Chili-Corn Casserole
from Food Network Magazine

  • 1 - 1 1/2 tablespoons butter
  • 4 - 5 ears of corn, kernels cut off* (I used 5 because my ears of corn were small)
  • Salt
  • 6 scallions, chopped
  • 3 - 4 cups Slow-Cooker Texas Chili (or any chili you have on hand)
  • 2 cups white cheddar cheese and Mexican blend cheese (or you can use any cheese you like)
  • 18 oz tube precooked polenta, cut into 1/2 inch rounds
  • Cooking spray

* Here's an awesome and time-saving tip I learned from the Shutterbean blog: Use a bundt pan to catch the corn kernels when you cut them off the ears!

1) Preheat oven to 450 degrees F.

2) Melt the butter in a pan over medium-high heat.

3) Add the corn and 1/2 teaspoon salt and cook for 5-6 minutes, or until tender.

4) Toss in the scallions and cook for about 1 minute, or until the scallions are soft.

5) Lightly spray the baking dish with cooking spray. (I used a 1 1/2 L pan, but the original recipe calls for an 8-inch square baking dish. Choose your poison.) Spread the chili in the bottom of the dish.

6) Sprinkle half of the corn mixture, and then half of the cheese over the chili.

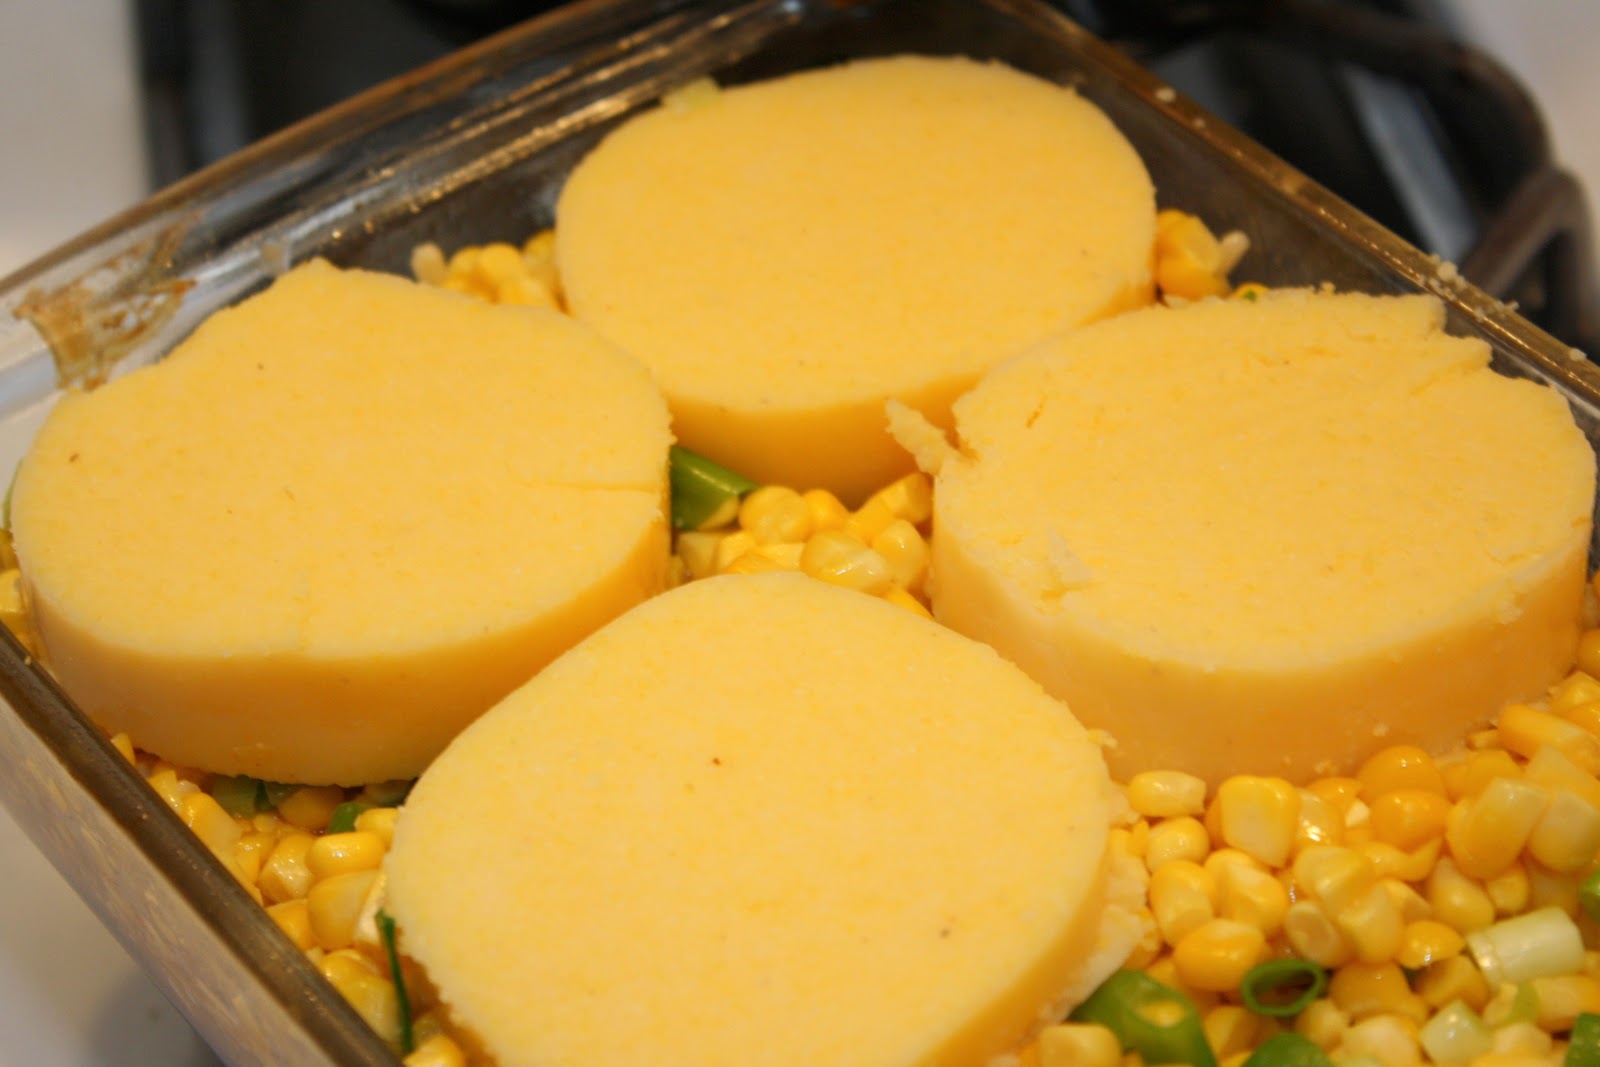
7) Add the polenta rounds on top of the corn mixture.
8) Sprinkle the remaining corn mixture and cheese over the polenta.

9) Bake in the oven for 15-20 minutes.  Watch the dish to ensure the cheese is golden and bubbly.  You really just want the entire casserole to heat through.

10) Let the casserole stand for 5-10 minutes before serving.


This was my first time trying ready-made/tubed polenta.  I found out that I didn't really like it on its own.  But once the polenta was soaked in the chili broth, then combined with the melted cheese, tender beef, fresh corn and spicy scallions, it was a whole different story.  I ate forkfuls of this casserole without even thinking.  I could probably finish half of the entire thing in one sitting.  I think next time I would try using creamy polenta in place of the ready-made polenta, but that would be the only change.  Other than that,  I would say you should whip this up as soon as possible for a quick and easy brunch or dinner!

Monday, September 19, 2011

Slow-Cooker Texas Chili

Summer, where did you go?

I enjoyed having you around.  I liked the bright sunshine and the endless outdoor events.  I liked the cute summer dresses I got to wear.  I liked the warm breezes that blew past me in the evening.

I didn't like the stifling, humid days that turned (several of) my cupcake attempts into mush.  I didn't like the way you made me sweat in places I really don't want sweat.  I didn't like the endless block parties across the street from me which threatened to only end after 3am.

But now your cooler counterpart is here: Fall.  Welcome.  You are my favorite.

NFL football has started again.  I can wear sweats with wild abandon. Pumpkin coffee is back at Dunkin Donuts.  Nuff said.

And now that I am thoroughly satisfied with the weather, I can sit down on the couch (in sweats, of course), watch some quality fall television programs, and chow down on a bowl of smoky, spicy chili.  More specifically, some Slow-Cooker Texas Chili. 


Slow-Cooker Texas Chili
slightly adapted from Food Network Magazine
yields 4 servings*

  • 2 1/2 lbs beef chuck, cut into 2 inch cubes**
  • 2 tablespoons packed light brown sugar
  • Salt
  • 2 tablespoons vegetable oil
  • 2 small onions, finely chopped
  • 5 cloves garlic, finely chopped
  • 2 4.5 oz cans chopped green chiles, drained
  • 1 tablespoon ground cumin
  • 1/2 cup chili powder
  • 2 tablespoons paprika
  • 2 tablespoons ground (cayenne) red pepper
  • 1 1/2 cups dark beer
  • 1 14 oz can diced tomatoes with chiles
  • sliced scallions, fresh cilantro, and/or sour cream for topping

**I would recommend trimming as much of the fat off the meat as possible (as you will see, I didn't do this...)

1) Place the beef in a large bowl and add 1 tablespoon brown sugar and 1 tablespoon salt.

2) Pour the vegetable oil into a large pan over medium-high heat.  Sear the beef on all sides.  You will probably need to do this in several batches.

3) Remove the beef from the pan and place it in a 5-6 quart slow cooker.

4) Lower the heat underneath the pan to medium.  Add the onion to the pan and cook for about 5 minutes, or until soft.

5) Stir in the garlic, chiles, cumin, chili powder, paprika, and cayenne pepper.  Allow the mixture to cook for about 3 minutes.

6) Pour in 1 1/2 cups dark beer (I used Sam Adams Octoberfest) and the tomatoes.  Allow the mixture to come to a simmer for about 3 minutes, scraping up the browned bits from the bottom of the pan.

7) Transfer the contents of the pan to the slow cooker.

8) Cover the slow cooker and cook on low for 7 hours.

9) Sprinkle the remaining 1 tablespoon of brown sugar over the chili.

10) Serve with scallions, cilantro, and/or sour cream for toppings.

Alert! Save 3-4 cups of chili for a Chili Corn Casserole that I'm posting soon on the blog!  If you don't plan on saving any chili for this dish, then you'll probably get another 2-3 servings out of this recipe.


This chili was different from most chilis I've had before.  In a good way.  There weren't the usual distractions from the meat, such as beans and other fillers, so I could really focus on how spicy, tender, and hearty the beef was.  I think there was a bit too much liquid in the chili once it was done.  So maybe I'd 1/2 cup to a cup less beer when making this again.  But otherwise, no complaints.  Add a dollop of sour cream and sprinkle scallions and cilantro over the chili and you get a perfectly comforting fall meal.

Wednesday, September 14, 2011

Spekuloos Cupcakes


I picked up a bottle of the "good stuff" several weeks ago.  What, pray tell, is the "good stuff"?  Spekuloos.  It's a gingerbread spread that I picked up from the Wafels & Dinges food truck earlier this summer.  It was a warm, gooey and spicy topping for a crispy, sweet waffle, so of course I devoured the whole thing.  Then my friend Katie and I each took a jar of the "good stuff" home.

I'm a little ashamed to admit that I didn't envision a cupcake right away.  Then I happened to be checking out one of my favorite blogs, Cupcake Project.  Stef had made peanut butter cookie dough that was safe to eat.  I thought that was pretty interesting, but I didn't get inspired by the recipe until I saw her next post: peanut butter cookie dough frosting.

I'm not particularly interested in making cookies.  They're not my dessert of choice, though I rarely turn one down.  But this frosting business sounded pretty tasty.  I whipped out my jar of spekuloos in anticipation.

I got down to business using the spekuloos in a batch of frosting.  I smeared this frosting over a batch of white cupcakes that I whipped up.  How was it? The frosting ended up not being for me because I think it was a little too heavy for the white cake.  If I could somehow lighten up the frosting a bit then I think I would like it more.  But in terms of flavors, I definitely got the sweet gingerbread taste that I was after.


Spekuloos Cupcakes
slightly adapted from A Sweet Spoonful's Salted Caramel Cupcake recipe
yields ~24 cupcakes

Print Recipe
  • 1 cup 2% milk
  • 4 large egg whites, room temperature
  • 2 1/4 teaspoons pure vanilla extract
  • 3 cups cake flour
  • 1 1/2 cups sugar
  • 4 teaspoons baking powder
  • 3/4 teaspoon salt
  • 1 1/2 sticks unsalted butter, cut into tablespoons, room temperature
  • 3/4 cup heavy cream

1) Preheat the oven to 350 F.

2) In a bowl, mix 1/4 cup of the milk with the egg whites and vanilla extract.

3) In the bowl of a mixer, combine the flour, sugar, baking powder, and salt.

4) Add the butter and the remaining 3/4 cup of milk.

5) Beat at a low speed until blended, then beat at medium speed until smooth, about 1 minute.

6) Add the egg white mixture in 3 additions, beating the batter on medium-speed for 20 seconds after each addition.


7) In another bowl, using a mixer, beat the cream until soft peaks form.

8) Stir 1/3 of the whipped cream into the batter, then fold in the rest with a spatula.


9) Fill cupcake liners 3/4 of the way full with the batter. Bake for 20-24 minutes, or until a toothpick inserted in the centers comes out clean.

10) Let the cupcakes cool for a few minutes in the cupcake tray.  Then remove them from the tray and allow to cool completely.

Note: I used the same cupcake recipe for my Salted Caramel Cupcakes.  I had issues at the time with the wrappers peeling away from the cake.  This time I used a mixture of paper and foil cupcake liners and didn't have an issue with either one.  I think I had the problem before because it was humid outside.


Spekuloos Cookie Dough Frosting
adapted from Cupcake Project's Peanut Butter Cookie Dough Frosting
yields ~4 cups

  • 1 1/2 cups all-purpose flour
  • pinch of salt
  • 1/2 cup unsalted butter, room temperature
  • 1 cup spekuloos spread
  • 1/2 cup granulated sugar
  • 1/2 cup brown sugar
  • 2 teaspoons vanilla extract
  • 1/4 - 1/2 teaspoons each of cinnamon, cloves, allspice, and nutmeg (I would go easy on the spices and add more later if you need too.) 
  • 6-7 teaspoons milk

1) Mix all ingredients together in a big mixing bowl, with the exception of the milk.

2) Add the milk slowly.  Add more milk for a creamier frosting or less milk for a thicker frosting.

3) Spread frosting on cooled cupcakes.

Friday, September 9, 2011

Asian Wasabi Noodle Salad


Sometimes I crave vegetables.  I know. That's weird.

Sometimes I also crave soy sauce.  Am I freaking you out yet?

I was trying to figure out how I could satisfy these cravings when I realized I had some wasabi fettuccine in the cupboard just begging to be used.  Thus, the seed was planted to create an Asian noodle salad.

Yeah, I have wasabi fettuccine hanging out in my kitchen.  What?  You don't?  No worries, just use regular pasta and stay the course...


Asian Wasabi Noodle Salad
yields 4-6 servings

Print Recipe 
  • ~1/2 lb wasabi fettuccine
  • 2 small broccoli heads, chopped
  • 3-4 small/medium carrots, cut into matchsticks
  • 1 medium red pepper, cut into matchsticks
  • 1/4 cup sliced scallions
  • 1/2 cup soy sauce
  • 4 tablespoons rice vinegar
  • 1 tablespoon olive oil
  • 1/2 teaspoon habanero sauce (or chili sauce)
  • 1 garlic clove, chopped


1) Add the pasta to a pot of boiling water.


2) When the pasta has about 3 minutes left, add the broccoli to the pot.


3) With about 1 minute left, add the carrot and pepper to the pot just to blanch them.


 4) Strain the pasta and vegetables in a colander and add to a bowl.


5) Toss in the scallions, soy sauce, rice vinegar, olive oil, habanero sauce, and chopped garlic.

6) Serve warm or at room temperature.


One of the things I really like about this recipe is that it's super quick and convenient.  By "quick", I just mean that you can whip the meal up in a timely fashion.  If you have killer knife skills, you will definitely make this dish more quickly than I did.  By "convenient", I mean that you only have to wash one pot when all is said and done.  I can get behind that one.


Let's talk about taste.  Phenom.  The carrots, peppers, and soy sauce all combine to form a beautiful salty and sweet combination.  You know I love a good salty/sweet combo.  The vegetables gave the salad a crispy crunchiness (Yes, that's a phrase. I just made it up.) and the Asian flavors were pretty prominent.  I definitely got my vegetable and soy sauce fix.  One thing I was disappointed about was the wasabi pasta.  I didn't exactly get any wasabi flavor from the pasta itself.  All of the heat seemed to come from the habanero sauce I added, but in the end this didn't hurt the taste at all.  Next time I think I'm going to up the ante and also add some edamame to this mix.  Because that would just be amazing.

Saturday, September 3, 2011

Strawberry Infused Vodka


I've got a new obsession.  Let's be clear.  I have a new obsession every few weeks, but this one is cracking me up.  It's called a podcast.  And they're funny, people.  Hilarious.

Let me stop here for a minute.  I know that many of you are already familiar with such things as a podcast.  But if you don't know, I'll explain.  A podcast is similar to a radio broadcast.  It's just broadcast across the internet instead of across the airwaves.  Just as with regular radio shows, these podcasts have themes and regular hosts.  They don't have to be funny, but why would you listed to a podcast if it wasn't entertaining?

My favorite podcast these days is hosted by Joy The Baker.  And even though it's called the Joy The Baker podcast, Joy is actually having a discussion with Tracy from the Shutterbean blog.  They talk about everything that you care about, everything that you don't care about, and sometimes they even talk about food.  They have the most hilarious commentary ever and it's totally worth listening to every week.

What does this have to do with infusing vodka? I'll tell you.  In one of these podcasts, Tracy mentioned that she likes to infuse strawberries into vodka.  I'm not mad at her. I love this idea and ran out to purchase mason jars to do the exact same thing myself.

Strawberry Infused Vodka
recipe from the Shutterbean blog

  • 1lb strawberries, hulled and chopped roughly
  • 750mL vodka (I used Skyy but any kind is fine)

1) Fill a mason jar or other sealable container with the strawberries.

2) Add the vodka almost to the top of the container.

3) Seal the container and store in a cool, dark place for 7 days.

4) Agitate the container daily.  (Try to do it twice each day, but if you forget it's fine.) DO NOT open the container before the 7 days are up.


5) When the vodka is ready, use a sieve to separate the strawberries from the liquid.  You can also choose to strain using a coffee filter if you don't want to have small dregs of strawberry seeds in your vodka.  (I didn't care so I just strained the vodka once using a sieve.)

6) Store the vodka in the refrigerator so that it's well chilled.


There are so many things you can do with this vodka.  Some of my personal faves include adding the vodka to cupcake frostings, drinking it chilled by itself, and including it in a mixed drink.  My favorite strawberry-infused vodka mixed drink?  A Strawberry G&T.  Yeah, get that strawberry gin and tonic.  I like my drink with a splash of lemon juice as well to make it a little tart.  And if I'm being super creative (also known as a super lush), I also add in a splash of tequila.  Do you see where this is going? So versatile. Love it.

Now get your drink on.

Monday, August 29, 2011

Potato-Portobello Gratin


I've been neglecting sides lately.

Entrees? Covered.

Desserts? I got you.  

But sides haven't been getting much love.  Enter the Potato-Portobello Gratin.  

The first gratin I made was a Broccoli Gratin, which was quite tasty.  Since then I've been interested in making another gratin, but I never quite got around to it.  I stumbled across this quick side dish a while ago so I finally made time to whip it up.

Potato-Portobello Gratin
slightly adapted from Alton Brown's recipe

  • 4 Yukon gold potatoes, peeled
  • 2 Portobello mushroom caps, sliced thinly
  • 1-2 teaspoons fresh dill, chopped
  • 1 1/2 cups grated Parmesan
  • 3/4 cup heavy cream
  • salt and black pepper, to taste


    1) Preheat oven to 400 degrees F.  Lightly spray a 9x13 inch baking dish with cooking spray.  Reserve 1/2 cup of the cheese for the top of the gratin.

    2) Thinly slice the potatoes into rounds.  (If you're fancy, you can use a mandolin for this.  I didn't have one so I worked on my knife skills.)

    Tip: I kept the potatoes in a bowl of water as I went along to prevent browning.

    3) For the first layer, lay the slices in overlapping rows on the bottom of the pan.  Lightly season the first layer with salt and pepper.

    4) Place the mushroom cap slices on top of the potatoes.

    5) Scatter a thin layer of dill over the mushrooms.

    6) Spread a handful of the cheese over the dill.

    7) Repeat Steps 3-6 until the gratin is completed.  Don't press down on the gratin while you are building it.  Otherwise, the cream won't be able to get between the layers.

    8) Pour the cream over the gratin.  You may not need to use the entire 3/4 cup of cream.  Pour until you see the cream at the top of the gratin or until you run out of cream.

    9) Sprinkle the 1/2 cup of reserved cheese over the top of the gratin.

    10) Cover the baking dish loosely with foil and bake for 40 minutes.  The gratin is done when you can easily pierce the potatoes with a sharp knife.

    11) If the gratin is done, remove the foil and bake for another 5 minutes.  You can also use a broiler for this step.*

    12) Remove the baking dish and allow the gratin to sit at room temperature for 15 minutes before cutting into it and serving.


    * I have a confession: The broiler tray of the oven is storing baking trays and I was too lazy to move them in order to use the broiler.  So there. Now you know.

    Overall, I like this side dish.  I didn't love it, however.  You guys already know me, right? So you wouldn't be surprised if I told you that I wanted more cheese in this.  There was also something else missing, but I can't quite put my finger on what it might be.  Here's what I did like: the potatoes were tender, the portobellos were still a little firm and the dill provided a nice fresh flavor.

    So there ya go.  This dish doesn't quite stack up to my Broccoli Gratin, but I am not discouraged. It's time to try, try again.


    Friday, August 26, 2011

    Creamy Corn Chowder


    It's summer.  Yes.  It's still summer.  Never mind the (very) minor chill in the air in the mornings and evenings now.  I'm holding on to the dream of warm weather sticking around for the coming few months.  It's still summer.  I swear.
    To help fuel my endless summer fantasy, I made a creamy corn chowder, courtesy of Rocco's Now Eat This Cookbook.  I wanted to take advantage of the fresh corn that is still in season right now and sweet, fresh corn always reminds me of summer. For some reason I was also craving a chowder of sorts, so Rocco's recipe really addressed both of my cravings.  Think of this as a gently compromise between summer and fall.


    Creamy Corn Chowder
    slightly adapted from Rocco's Now Eat This cookbook
    makes ~8 servings

    Print Recipe
    • 2 small onions, diced
    • Drizzle of olive oil
    • Corn kernels from 6 ears fresh corn
    • 3 cups cauliflower, diced
    • 5 cups 2% milk (or any % desired)
    • Habanero sauce, to taste
    • 4.25 oz can green chiles, diced finely
    • 14 oz Greek yogurt
    • 1 bunch scallions, sliced thinly
    • Salt and pepper, to taste

    Tip: If you do harvest the corn kernels from ears of fresh corn, run the back of your knife down the empty ear of corn once you're done removing the kernels.  "Corn milk" will be produced and you can add this to the soup for extra flavor.

    1) Add the olive oil to a large pot over medium heat.  When the oil is fragrant, add the onion and corn.


    2) Saute the onion and corn until they start to soften.  Season with salt and pepper.

    3) Add the habanero sauce, cauliflower and milk. (Add the "corn milk" at this time as well.)  Cover the pot and bring the chowder to a boil.


    4) Reduce the heat to medium-low and allow the chowder to gently simmer until the vegetables are tender, approximately 15 minutes.


    5) Strain 2 cups of the chowder solids through a sieve or finely-slotted spoon and reserve for later.  Add half of the green chiles to the chowder solids.

    6) Add the other half of the green chiles to the pot of chowder.

    7) Using an immersion blender or regular blender, puree the chowder until smooth.  (If using a regular blender, be careful when filling the blender with the hot chowder! Return the chowder to the pot once pureed.)

    8) Add the chowder solids back into the pot and bring the chowder to a boil.


    9) Remove the pot from the heat and stir in the yogurt and scallions.


    10) Season the chowder to taste with salt, pepper, and habanero sauce.

    If you like, you can choose to roast the ears of corn prior to adding them to the pot.  That should infuse a smoky flavor into the chowder.  You can also choose to puree the entire chowder, but I personally like that the chowder has chunks of corn and chile submerged in the puree.  Every spoonful of the chowder is creamy from the puree, but then your mouth realizes that there are itty-bitty morsels in there to munch on.  The corn is sweet, the chiles are tangy, and the scallions are mild and crunchy.  The heat from the habanero sauce is subtle, but it adds a little kick to the dish that would sorely be missed otherwise.  This chowder turned out to be more filling than I had initially anticipated but each mouthful was taken down with pure joy.