Showing posts with label Side Dish. Show all posts

Saturday, April 26, 2014

Oven-Roasted Asparagus


You guyssss...

I have to tell you about the NYC Cat Cafe.  I just heard about it and it's going on right now!  Clearly I'm going because I love cats and coffee.  So why can't I have it all?  I can.  I'm going to sit in there all day and survive on coffee and pre-packaged snacks forever and ever.

OK, I can't do that.  I do need to step up my game in the dietary department, though.  I've been eating Tostitos tortilla chips, brie cheese, and almonds like it's my job.  So here's my attempt at pulling my life together.

We're finally getting some warmer weather in these Northeastern parts, so we must celebrate with asparagus.  And cheese.  You know this.  Tender, fresh asparagus is tossed with olive oil and salt and pepper and then roasted until it's perfect.  Top with freshly grated Parmesan and you've got yourself a wonderful side dish, or a questionable (but healthy!) lunch.  Your choice.

Sunday, January 12, 2014

Roasted Carrots with Thyme


I will advise you that I do have more decadent desserts coming up in the next few posts.  I just can't help myself.  I love to bake after the holidays.  You know, that time when everyone is totally done with sweets and treats?  Yep, that's when I'm hitting my stride.  Whatever.  More for me!

But right now, I'm back on the healthy bandwagon once again.  I couldn't resist once I spotted purple and white carrots in the Union Square Greenmarket.  I was with my mom and nephew and the three of us were immediately intrigued.  Two minutes later, 2 lbs of carrots were purchased.  And I had no idea what I was going to do with them.

I soon decided to roast the vegetables with herbs and seasonings since roasting veggies is the easiest, yet tastiest thing ever.  It doesn't necessarily leave you with pretty-looking vegetables, but the taste will make up for that.  In the future, I would probably sprinkle a little sugar on top of the carrots as well since I like my carrots sort of sweet, but I loved the outcome based on the recipe below all the same!


Friday, January 3, 2014

Curried Chickpeas with Spinach


Happy New Year!  I hope you all had a safe and festive entrance to 2014.

You all knew I was going to fall victim to the peer pressure, didn't you?  It's time to crank out the healthy recipes for all those folks heading to the gym.  January is the standard month for everyone to descend up any gym within sight.  I am just cringing thinking of signing up for my workouts for the next few weeks.

Oh well, since I'm sure all of the classes I want to take will be full, I'm going to focus on eating better.  Here I am bringing you more vegetables.  I can't seem to stop myself, so I'm just embracing this.

My love of hummus extends from my love of garbanzo beans, which is...interesting, considering that I hate most beans.  The only beans I care to eat are these and edamame.  Everything else can just back it up.  These beans happen to be curried, though.  That is a new phase I'm entering as well.  I love curry.  I think I get that from my momma.  Oh, and there's spinach and tomato sauce.

Wow, I'm sure you're excited to see what I'm going to bring you in 2014!  We're kicking it off with garbanzo beans and I'm talking about spinach and curry...  I'm pretty sure I'm losing followers as I type this.  Yup yup.  I promise I'm going to make it up to you with some decadent goodies soon, but for right now I've thrown together some curry, chickpeas, and spinach juuuuust for you.

By the way, this recipe is super quick, so you can get back to working on your fitness in no time!


Monday, September 2, 2013

Watermelon & Mint Salad


The title of this post is way less interesting than originally intended.  You see, I picked up a few items at the grocery store the other day and this stash just so happened to include watermelon and an avocado.  The thought never entered my mind to combine them together.  I'm typically a salted-avocado slice kind of gal.  However, I then saw this post which combines watermelon and avocado into a salad! Since I already had most of the ingredients at hand I figured I'd throw this together to see what it was all about.

Let's segway to that moment when I slice open my avocado and there's a black ring throughout the entire fruit... You know that avocado got the stink side-eye.  But I pulled up my big girl pants and decided to simply leave the avocado out of this equation.  Problem solved in three seconds flat.  The recipe is pretty free-form, so I grabbed the ingredients I did have and got to work.

Thursday, July 18, 2013

Farro Salad


I never thought I'd be one of those grain-loving hippies.  But here we are.  Eating farro salad on the real.  I should also tell you that I never envisioned myself eating a cold salad (as in a salad that was once warm and is now cold).  But let me tell you that this salad is excellent either cold, room temperature, or warm.  It's amazing how versatile this dish is.

In case you've never heard of farro, here's the quick low-down.  Farro is a grain that has quite a nutty flavor.  If you want to make things really simple, one could say that farro is very similar to brown rice.  Before this recipe, I had never tried farro before, although I saw numerous favorable reviews of it on the food blogs that I follow.

When Shutterbean originally made this salad, I was finally sure I needed to recreate it myself.  I think I was "wooed" by Tracy's description of Giardiniera-like ingredients and the addition of feta cheese.  I have a newfound obsession* with Giardiniera and we all know how I feel about cheese.  Yes, I would be making this dish.  Just watch me!

* I am quite aware that I have a new obsession every other week.  Let's not be judgmental in these parts.  Thanks.

Wednesday, May 22, 2013

Asparagus, Tomato & Basil Couscous


About this gorgeous weather that we've started having...Thank you.  I am completely on board with Mother Nature doing a 180 and finally realizing what time of year it is.  And this "change of heart" is perfectly timed with the upcoming Memorial Day holiday.

Since spring is finally springing, I guess I should stop showing you recipes with chocolate, huh? (The correct answer is: No.) Never, ever fear.  There is chocolate in the quite immediate future, but for now, we will have fresh vegetables, mixed with some couscous and cheese.  Who can hate on that?

This quick and easy dish came to me from one of my favorite blogs, Shutterbean.  Tracy never fails to find just the right thing to make at the right time.  When I saw this post last week, I knew I had to get the ingredients and make it.  Here's a note, though.  I had very few of the ingredients already, but once I subbed out a few items, it turned out that all I needed was some asparagus.  

Me - 1, Dead zone where my perishable food goes to curl up and die - 0.

Thursday, March 14, 2013

Beer Batter Bread


Can we just get ready for St. Patrick's Day already?  This is pretty much my most favorite holiday of the year, primarily because it's a day to celebrate drinking.  Yes, I'm sure there is another, deeper meaning behind St. Patrick's Day, but that's not where this blog post is going.

For the past few years, my roommate and I have had a St. Patrick's Day morning/brunch party in Hoboken.  Hoboken's St. Patty's Day is celebrated on the first Saturday of the month of March.  It's a long story, but that's how it is.  We didn't do that this year since my roommate is in the process of selling the apartment.  We wouldn't want a repeat of that wine-on-the-ceiling incident that occurred a few years ago...That would be no bueno.

But what I could have is this beer bread.  I whipped this up in a matter or minutes, and uh, it didn't actually make it to any parties anywhere.  I sort of ate it.  Could you blame me?  It's all buttery and beer-tasting and stuff.  So go make your own.  It takes no time at all.

Monday, February 11, 2013

Mustard and Garlic Roasted Potatoes


This is a recipe I didn't know I was waiting for.  But clearly I was waiting for this to come into my life.  I should also mention that if you have a french fry obsession like, um, a friend of mine, then this may also be the potato dish for you.

I think I'm going to need an intervention for these potatoes.  This is somewhat serious.  When these things came out of the oven all crispy and crackle-y and caramelized and junk, I nearly lost it.  And you may lose it as well if you also have a love of mustard and garlic and the like.

While I have been meaning to whip up a variation of this side dish for a while, I got the extra push to create this because of my monthly Secret Recipe Club.  This month, I was assigned to Suzanne's blog, Thru The Bugs On My Windshield.  Although there were other recipes I was quite tempted to indulge in, such as the Blueberry Delight Coffee Cake or this Tortellini Salad, the potatoes really spoke to me and my love of carbs.  Let's be truthful here.  Carbs usually win out every time.

Friday, January 25, 2013

Brussels Sprouts Salad


Listen.  You don't even want to know what's going down over here.  There are nachos, chicken fingers, fries, sweet potato fries (which are stupid good), pie, mac and cheese, s'mores, and donuts that have been ingested by myself in the past week.  I mean, this is not right.  Oh, and let's not forget the massive quantities of wine and beer that I have also downed.  Did I tell you that, to help pass my time on disability, I joined my favorite bar's Beer Club?  Don't get me started on the damage that little action has done to my insides.

I know that I am totally to blame for this and I have already apologized to myself.  I've also been trying to make things up by eating more salad.  My go-to salad is a random mix of salad greens, mushrooms, caramelized onions, avocado, and mozzarella cheese, drizzled with balsamic vinegar and olive oil.  My second favorite salad is from my bar, which is a fantastic chopped salad topped with grilled salmon.  I order this while putting in work to drink all 250 beers in the Beer Club.  What was I thinking?

In  order to keep things interesting in the salad arena, I figured I should test out a new salad recipe.  I've been trying to get into brussels sprouts lately and since this recipe got great reviews from a few bloggers, I wanted to try it out too.  Monkey see, monkey do!

Thursday, January 3, 2013

Asparagus & Grilled Onions with Mozzarella


Happy New Year everyone!!!

I would like to take a pause and momentarily provide you with a salad.  A vegetable salad.

I am a fan of this sitch.  It's really been too long since I've made asparagus.  Since my mom is staying with me for a few days and she loves it, I decided to dig up some bookmarked recipes and see what was what.  I mean, I could use some health up in my life.  Who doesn't?

I eventually picked out this salad because, beside the asparagus being present, of course there are grilled onions.  Just say yes to onions.  Grilled onions deserve a double-yes.  Can we make that happen?  Thanks. Theeeeen, we also have the almonds and cheese and olive oil and vinegar....Was someone watching me in the kitchen to figure out everything I like and then make a salad out of it?  This is just genius.  Let it happen.

Oh, and just so you know, I amped things up a bit by drizzling Herbes de Provence olive oil over everything.  Have I told you that I'm into olive oils recently?  There may possibly be a new bottle of Trader Joe's Black Truffle olive oil in our pantry as well.  I just imposed a January 2013 "no-buy" on myself so hopefully these impulsive purchases will stop.  Like now.  Except I just bought a new shirt online last night.  But that was with a gift card, so technically, I didn't actually buy it.  See how that works?

I'm digressing.  Where was I?  Oh, this vegetable salad.  Let's get at it.

Saturday, September 15, 2012

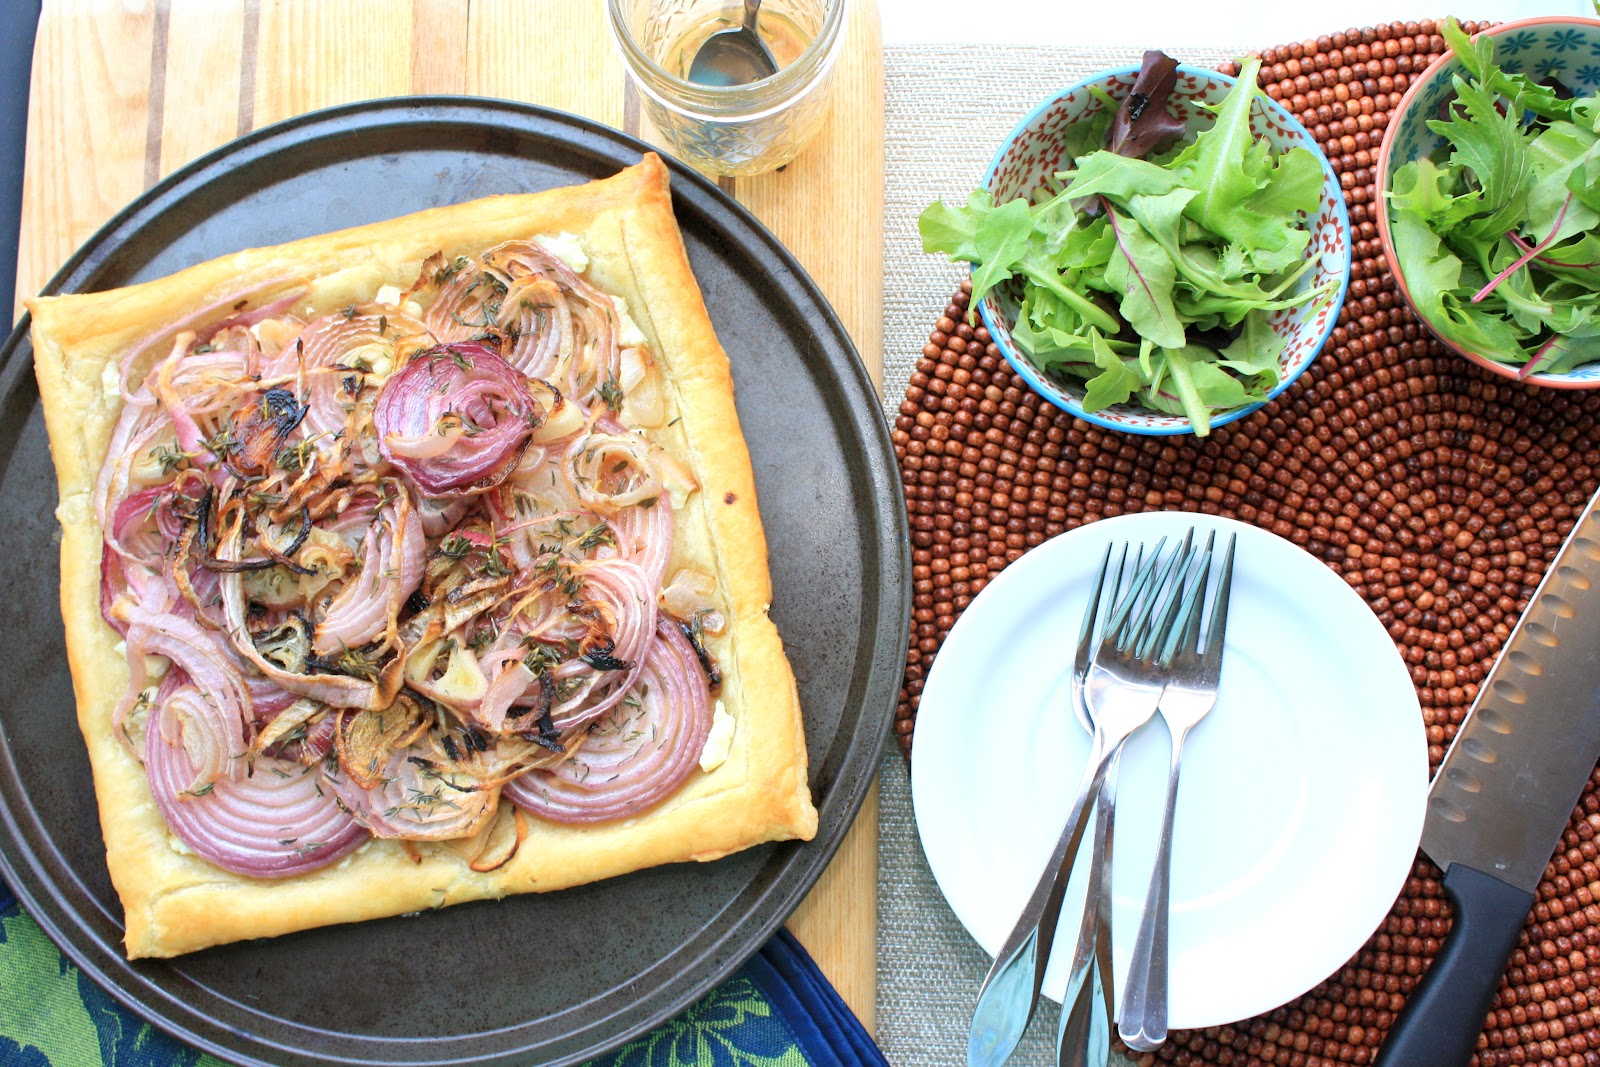
Roasted Onion and Shallot Tart


Tarts.  It's time for tarts.  I can feel it in the air.  This is my way of easing back into the kitchen after a summer filled with sandwiches and salads.  I can't say that my sandwich-and-salad phase was a bad thing.  In fact, it was quite a tasty thing.  But now it's time for something different.

I found a few recipes for various tarts in my extensive stash, but this roast onion and shallot tart quickly jumped out at me.  I've been meaning to make this for months, mostly because (I'm not gonna lie) the pictures of the tart sucked me in.  It was just begging to be made, so I decided to take on the challenge.

Sunday, September 2, 2012

Roasted Beet Salad With Feta & Arugula


Just so you know, I have a humongous, stupidly long list of recipes that I want to make one day.  They happen to be saved in my browser's Bookmarks section, separated by categories and in order of my desire to make said recipes.  They also happen to be residing within the food magazines that I receive regularly and store in the corner of my bedroom.  It is also possible that I have a binder with categorized recipes that have been ripped out of other food magazines.

With this veritable derth of recipes at my fingertips (I'm feeling very verbose at the moment), why why why would I choose to make something that I don't already have a recipe for?  These are the questions one must ask oneself.  This is just crazy, folks.

Last week, as I was driving back to Hoboken from my client's office in Pennsylvania, I began to think about beets.  Specifically, roasted beets in a salad.  With this image in mind, I hit up the local farmer's market and was able to snag a bunch of red beets and another bunch of golden beets. The first step of this game plan was to roast these beets.  That took place here.

I also got carried away and grabbed some arugula, corn, and basil at the market.  These are perfect fixings to create a sweet, savory, and healthy salad.  Note that this salad is more of an "assemblage" deal.  I'm sort of liking that. It allows me to start eating sooner!

Wednesday, August 29, 2012

How To Roast Beets


Beets happen to be one of those things I sort of associate with an aluminum can (or in more recent years, a glass container).  Make no mistake.  I have no problem chomping down on those beets.  I have always been a fan of these lovely root vegetables.

However, I recently began wondering if I could roast my own beets.  I have no idea where this urge came from.  It's just one of those things I can't explain.  There are a lot of things I can't explain about myself, but let's not go there.

Let's talk about beets.  Roasted beets, specifically.  Roasted beets are tender and slightly smoky, yet slightly sweet.  They're one of my new go-to vegetables.  You can do a lot with them.  More on that topic coming in a future blog post...

This "recipe" is more of a guideline.  Before I woke up one day and decided to roast my own beets, I didn't realize how easy it would be.  I found out that the most difficult part was trying to get the red beet stain off my fingers.  After the first beet, I got wise and donned the latex gloves that I keep around to chop jalapenos.  This is a wise move, my friends.

I was able to find both red and golden beets at my local farmers market, so I snagged those and got to work on roasting them up!  Another smart move is to take those beet greens and saute them with some garlic and red wine vinegar.  Go on with your bad self.


Friday, July 20, 2012

Corn, Asparagus & Green Bean Salad


Maybe you've figured this out by now.  If not, I'm about to tell you:  I have begun an obsession with vegetables.  This means that you can expect to see a few veggie-related dishes on this blog in the near future. Just a heads-up.

Corn.  Let's talk about it.  There's nothing like a fresh ear of corn.  Or, in my case, fresh corn kernels.  I have an aversion to eating corn on the cob, even though I become obsessed with fresh corn kernels all summer long.  I have this burning desire to put corn in everything.  The end of corn season is a sad sad time in my kitchen.  (Although that means that Fall is right around the corner and that's my hands-down favorite season!)


This week, I was inspired to make a corn salad by Julia from Fat Girl in a Skinny Body. This is my first real taste of this year's summer corn so I wanted to keep things simple.  I didn't want to drown it in heavy cream like my scalloped corn with bacon from last year.  (Did I mention that dish turned out magnificently delicious?  I may need to make that scalloped corn again.)  But for now, I wanted to have a light side dish that really allows you to taste the corn and asparagus.  Don't forget the asparagus, since that's in season as well.  Oh, and I also tossed in green beans, just because I had them on hand.  Don't you cook like this too?   I can't be the only one.

Monday, October 17, 2011

Fresh Corn and Goat Cheese Polenta


For as much as I've been pretending it's still summer, I really do love fall.  And I will have more fall-related recipes on this blog soon.  But I think I've finally satiated my summer corn fixation with one final final final corn recipe.  I've been saving this one for a few weeks.  It's not because I'm selfish, but because I simply haven't had the time to get around to it.  So now here it is.  Hopefully this recipe isn't too late to catch the last ears of fresh corn at the market or store.

When I made that Chili-Corn Casserole the other day, I found that I still had a lot of polenta left over.  I decided I would use the rest of it in a variation of a Joy the Baker recipe.  And I would definitely recommend this fresh corn and goat cheese polenta action for a quick breakfast or brunch situation.  


Fresh Corn and Goat Cheese Polenta
adapted from Joy the Baker's Fresh Corn and Goat Cheese Grits recipe
yields 4-5 cups

Print Recipe
  • 1 ear of corn, kernels cut off
  • 1/2 small onion, diced
  • 1 clove garlic, chopped
  • 18 oz tube precooked polenta, chopped as finely as possible
  • 2 tablespoons butter
  • 1 cup 2% milk (or whichever kind of milk you prefer)
  • 1 teaspoon olive oil
  • 2 oz goat cheese, crumbled
  • Salt
  • Pepper
  • Paprika and/or cayenne pepper (optional)


1) Drizzle the olive oil in a saucepan and saute the onion for 1-2 minutes.


2) Add the corn and garlic to the pan.  Saute for another 1-2 minutes, or until softened.


3) Season with salt and pepper to taste.

4) Meanwhile, combine the polenta, butter and milk in a microwave-safe bowl.  Microwave the mixture for a minute at a time, mashing the polenta and milk together periodically to make it creamy.  (You can also do this step in a pot over medium heat on the stove, but it's quicker in a microwave.)


5) Stir the corn and onion mixture into the polenta mixture.


6) Add the crumbled goat cheese.  Season with salt and pepper to taste

7) Sprinkle a dash of paprika and/or cayenne pepper to taste.

I think this dish could have been amped up by using creamy polenta that was made from scratch instead of the pre-made polenta.  But if you're in a pinch, or if you just have leftover pre-made polenta, then you can make this instead.  The creamy, tart goat cheese melts into the butter polenta and provides the perfect complement to the sweet corn.  This dish would be a great addition to any meal.

Tuesday, October 4, 2011

Scalloped Corn with Bacon


I know. 

I know that corn season is almost over.  I know that in spite of this fact, I've still been throwing corn dishes at you as if it was my job. Don't judge me.  I am ashamed to admit that I really only discovered the wonderful lusciousness of fresh corn dishes this year.

This doesn't mean that I've never eaten fresh corn prior to this year.  Let's not get it twisted.  I just never took the time to cook or bake with fresh corn.  So although I'm so late jumping on this bandwagon, jump on it I did.  And I'm soooo glad that I'm there.  Who knew the party was this much fun?

Just to make it funner (yeah, I just said that) I threw in some bacon too.  Because everything's better with bacon.  If you didn't know that, well, now you do.

Shout outs to Shutterbean and the Joy The Baker podcast for the heads up on this recipe.  Otherwise I would totally have missed it and that would have been a tragedy.


Scalloped Corn with Bacon
  • 2 tablespoons butter
  • 1 small yellow onion, finely diced
  • 2 tablespoons all-purpose flour
  • Salt
  • Pepper
  • Habanero sauce
  • 1 1/2 cups half and half
  • 3 cups sweet corn (about 5 ears)
  • 2 egg yolks
  • 4 strips bacon, fried and roughly chopped*
  • 1/2 cup fresh bread crumbs
  • Cooking spray

1) Preheat the oven to 375 degrees F.  Lightly spray a baking dish with the cooking spray.  I used a 9"x13" or 1-1/2 quart baking dish.

2) Melt 1 tablespoon butter over medium heat in a medium to large pan.  Add the onion and a pinch of salt.  Saute until softened, about 5 minutes.


3) Sprinkle in the flour, salt, pepper, and habanero sauce to taste.  Stir to combine.

4) Pour in the half and half and stir until the sauce begins to thicken.


5) Add the corn and simmer for 2 minutes.  Taste and add more seasonings if necessary.  Remove the corn mixture from the heat.


6) In a small bowl, beat the egg yolks together, and then stir into the corn.

7) Stir in the chopped bacon.


8) Pour the entire mixture into the baking dish.  Sprinkle the fresh bread crumbs over the top of the mixture and dot with 1 tablespoon of butter.


9) Bake for 30 minutes, or until the butter is melted and the breadcrumbs are golden and toasted.

* Tip: You can use my method and lay the strips of bacon on a foil-lined baking sheet.  Pop them in a 400 degree F oven for 8-10 minutes.  When the bacon is done, simply toss the foil away!


Seriously, let's use fresh bread crumbs, people. I have tried to dodge this step in the past, but the taste difference between fresh and packaged can't be measured.  I gave in this time and I'm happy I did.  You can do it too.

The fresh corn is amazing when it's mixed with the butter, cream, bacon, and breadcrumbs.  Doesn't that sound like a perfectly balanced meal?  It's definitely balanced.  Again, don't judge me.  This is a perfect and easy side dish that would complement any meal.

Monday, September 26, 2011

Chili-Corn Casserole


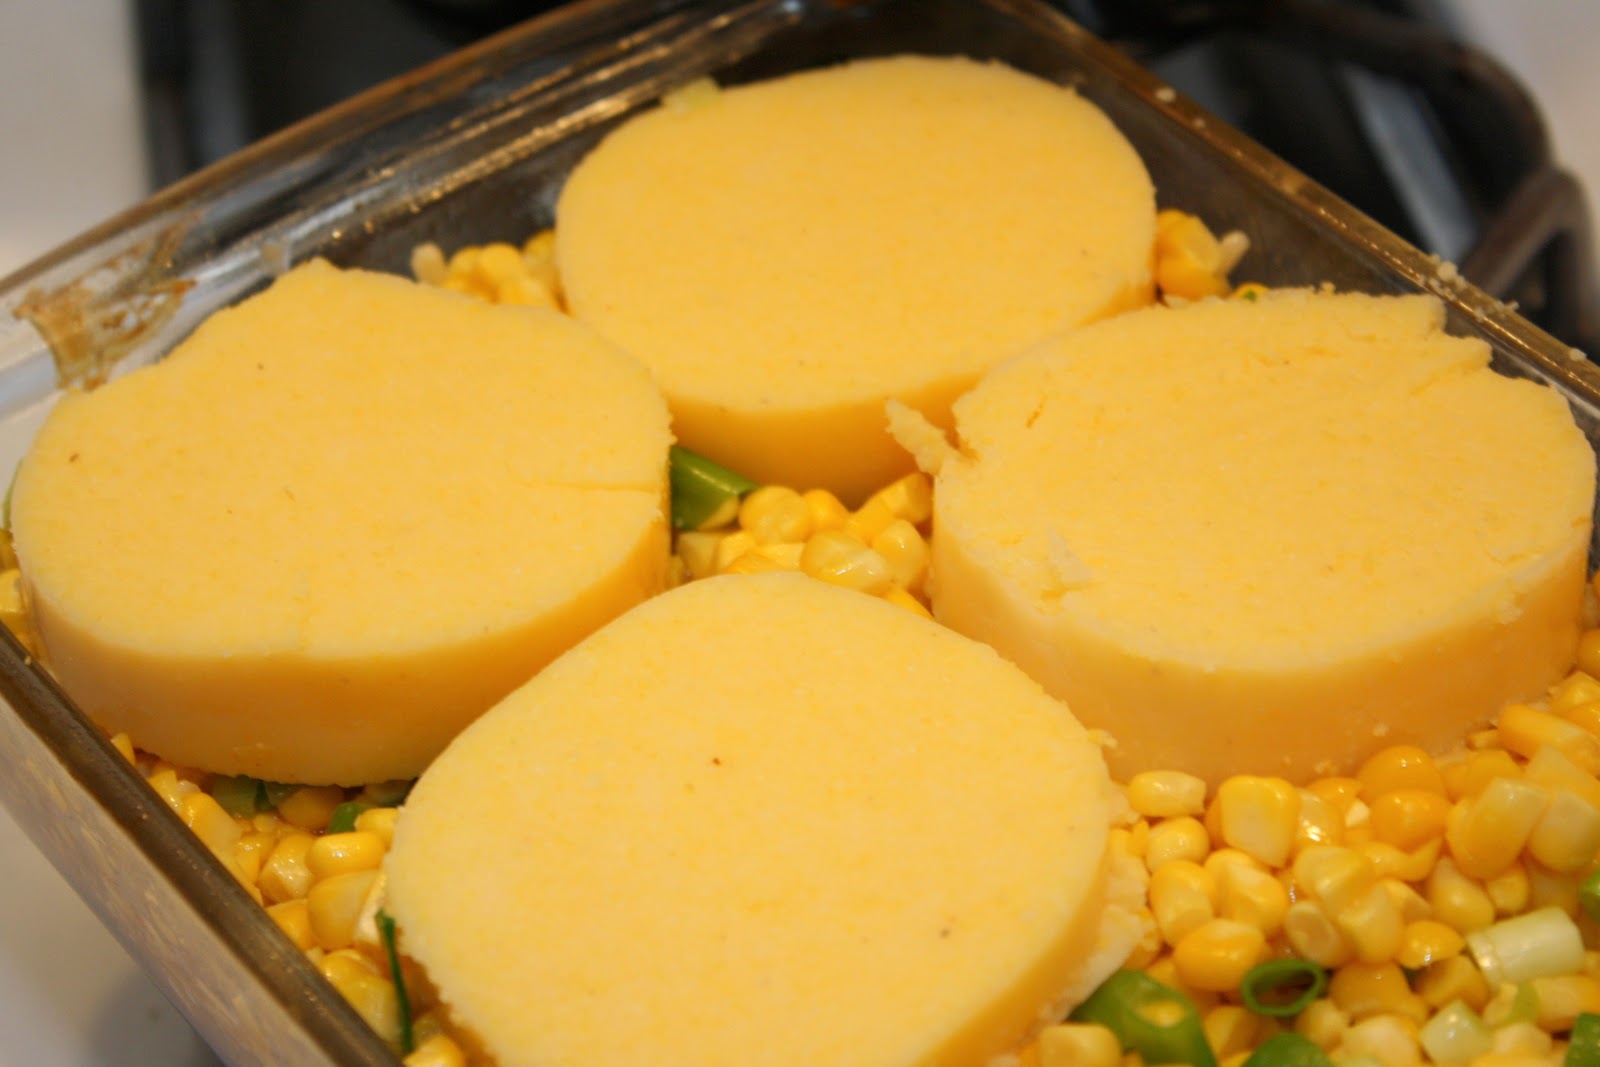
Remember when I told you to save those few cups of Slow-Cooker Texas Chili for later?  Well, have no fear.  It is now later.  And we're about to make some magic by mixing this chili with corn, scallions, polenta, and cheese.

Get on this.  It is heavenly.

I shouldn't have to "note" this, but I will, just to make sure you know...You can use any chili you like in this dish.  You don't have to make the Slow-Cooker Texas Chili recipe.  You should make it because it's  delicious, but I realize it may not be for everyone.  So have at it with whatever kind of chili you want.

Now can we just jump right in?  Because I'm starving (as usual) and I need my sustenance.


Chili-Corn Casserole
from Food Network Magazine

  • 1 - 1 1/2 tablespoons butter
  • 4 - 5 ears of corn, kernels cut off* (I used 5 because my ears of corn were small)
  • Salt
  • 6 scallions, chopped
  • 3 - 4 cups Slow-Cooker Texas Chili (or any chili you have on hand)
  • 2 cups white cheddar cheese and Mexican blend cheese (or you can use any cheese you like)
  • 18 oz tube precooked polenta, cut into 1/2 inch rounds
  • Cooking spray

* Here's an awesome and time-saving tip I learned from the Shutterbean blog: Use a bundt pan to catch the corn kernels when you cut them off the ears!

1) Preheat oven to 450 degrees F.

2) Melt the butter in a pan over medium-high heat.

3) Add the corn and 1/2 teaspoon salt and cook for 5-6 minutes, or until tender.

4) Toss in the scallions and cook for about 1 minute, or until the scallions are soft.

5) Lightly spray the baking dish with cooking spray. (I used a 1 1/2 L pan, but the original recipe calls for an 8-inch square baking dish. Choose your poison.) Spread the chili in the bottom of the dish.

6) Sprinkle half of the corn mixture, and then half of the cheese over the chili.

7) Add the polenta rounds on top of the corn mixture.
8) Sprinkle the remaining corn mixture and cheese over the polenta.

9) Bake in the oven for 15-20 minutes.  Watch the dish to ensure the cheese is golden and bubbly.  You really just want the entire casserole to heat through.

10) Let the casserole stand for 5-10 minutes before serving.


This was my first time trying ready-made/tubed polenta.  I found out that I didn't really like it on its own.  But once the polenta was soaked in the chili broth, then combined with the melted cheese, tender beef, fresh corn and spicy scallions, it was a whole different story.  I ate forkfuls of this casserole without even thinking.  I could probably finish half of the entire thing in one sitting.  I think next time I would try using creamy polenta in place of the ready-made polenta, but that would be the only change.  Other than that,  I would say you should whip this up as soon as possible for a quick and easy brunch or dinner!

Monday, August 29, 2011

Potato-Portobello Gratin


I've been neglecting sides lately.

Entrees? Covered.

Desserts? I got you.  

But sides haven't been getting much love.  Enter the Potato-Portobello Gratin.  

The first gratin I made was a Broccoli Gratin, which was quite tasty.  Since then I've been interested in making another gratin, but I never quite got around to it.  I stumbled across this quick side dish a while ago so I finally made time to whip it up.

Potato-Portobello Gratin
slightly adapted from Alton Brown's recipe

  • 4 Yukon gold potatoes, peeled
  • 2 Portobello mushroom caps, sliced thinly
  • 1-2 teaspoons fresh dill, chopped
  • 1 1/2 cups grated Parmesan
  • 3/4 cup heavy cream
  • salt and black pepper, to taste


    1) Preheat oven to 400 degrees F.  Lightly spray a 9x13 inch baking dish with cooking spray.  Reserve 1/2 cup of the cheese for the top of the gratin.

    2) Thinly slice the potatoes into rounds.  (If you're fancy, you can use a mandolin for this.  I didn't have one so I worked on my knife skills.)

    Tip: I kept the potatoes in a bowl of water as I went along to prevent browning.

    3) For the first layer, lay the slices in overlapping rows on the bottom of the pan.  Lightly season the first layer with salt and pepper.

    4) Place the mushroom cap slices on top of the potatoes.

    5) Scatter a thin layer of dill over the mushrooms.

    6) Spread a handful of the cheese over the dill.

    7) Repeat Steps 3-6 until the gratin is completed.  Don't press down on the gratin while you are building it.  Otherwise, the cream won't be able to get between the layers.

    8) Pour the cream over the gratin.  You may not need to use the entire 3/4 cup of cream.  Pour until you see the cream at the top of the gratin or until you run out of cream.

    9) Sprinkle the 1/2 cup of reserved cheese over the top of the gratin.

    10) Cover the baking dish loosely with foil and bake for 40 minutes.  The gratin is done when you can easily pierce the potatoes with a sharp knife.

    11) If the gratin is done, remove the foil and bake for another 5 minutes.  You can also use a broiler for this step.*

    12) Remove the baking dish and allow the gratin to sit at room temperature for 15 minutes before cutting into it and serving.


    * I have a confession: The broiler tray of the oven is storing baking trays and I was too lazy to move them in order to use the broiler.  So there. Now you know.

    Overall, I like this side dish.  I didn't love it, however.  You guys already know me, right? So you wouldn't be surprised if I told you that I wanted more cheese in this.  There was also something else missing, but I can't quite put my finger on what it might be.  Here's what I did like: the potatoes were tender, the portobellos were still a little firm and the dill provided a nice fresh flavor.

    So there ya go.  This dish doesn't quite stack up to my Broccoli Gratin, but I am not discouraged. It's time to try, try again.


    Monday, August 1, 2011

    Indian Curry with Paneer

    Somehow, I missed it.  What, you may ask?  Only the first milestone in a blogger's online life: the 100th blog post.  If you can count (apparently I can't), you will see that this is the 103rd blog post on my site.  Which means that it has taken me weeks to even realize that I passed the 100th blog post.  So.  Happy 103rd post to me!

    What does this have to do with my  Indian Curry with Paneer recipe?  Nothing.  I'm just venting.  So let's get back to the food.

    I sort of stumbled across this recipe.  I had a block of paneer in the refrigerator that I needed to use.  After a web search for recipes, I came upon this one at allrecipes.com (the original recipe's link is below).  Since it sounded similar to other Indian dishes that I've made (and loved) in the past, I figured I'd give it a try.  Bonus points to this dish for allowing me to use those stray peas which were hanging around the freezer for a while.

    Side note here: I love a showy blog, with pretty pictures and the like.  But if the food sucks, then it's no good.  All Recipes usually doesn't have picture-perfect photos.  You're lucky if you see a photo of the food at all.  But that doesn't matter in the long run because I've never made a bad dish from this website.  Seriously.

    Indian Curry with Paneer
    adapted from All Recipe's Basic Indian Curry with Paneer recipe

    Print Recipe
    • 1/4 cup olive oil
    • 1 large yellow onion, chopped
    • 1 teaspoon minced garlic
    • 3/4 teaspoon grated ginger
    • 1/4 teaspoon ground ginger powder
    • 2 jalapeno peppers, finely chopped
    • 1/2 teaspoon chili powder
    • 3/4 teaspoon ground cumin
    • 3/4 teaspoon ground coriander
    • 3/4 teaspoon garam masala
    • 3/4 teaspoon ground turmeric
    • 1 (~14 ounce) can stewed tomatoes, pureed
    • 1 tablespoon ketchup
    • 14 oz paneer, cubed
    • 6 ounces frozen peas, thawed
    • 1/4 cup greek yogurt
    • 1/4 cup water

    1) Cube the paneer and place in a bowl of boiling water for 10-15 minutes. Drain the cubes and set aside for later.

    2) Heat the oil in a pan over medium heat.

    3) Add the onions and saute until lightly browned.

    4) Add the garlic and ginger and saute for another minute.

    5) Turn the heat down to low and add the jalapenos. Saute for another minute.


    6) Mix in the spices (chili powder, cumin, coriander, garam masala and turmeric).  Allow the mixture to cook for another minute.

    7) Stir in the pureed stewed tomatoes and ketchup.  Add about 1/4 cup water.


    8) Add the paneer and peas.  Allow the curry to simmer for 2-3 minutes.


    9) Stir in the greek yogurt.


    10) Increase the heat and let the curry come to a boil.  Cook for 3-4 minutes.

    11) Serve warm, over rice or with naan.


    This was the best paneer dish I've made so far.  I'm especially grateful, considering how the recipe was a complete leap of faith for me.  Way to go All Recipes.  In adjectives, this curry was spicy, tangy, smooth and creamy.  Does this make sense?  You don't get all those flavors/textures at once, but rather over the course of eating the dish, which is a pretty pleasant experience.  And I can't forget the peas, which I love.  I definitely need more peas in my life.  This will pretty much be my go-to curry dish from now on.  That is all.